Tag: crafts for home

DIY 359: YUDU, the personal screen printer does patterns

I love the ease with which I can create screen printed fabric on the YUDU. I made a simple leaf design and turned it 180º as I worked across the fabric. I will be turning these into curtains for my sewing room.

You too can screen print using the YUDU~Here is a resource if info and great tutorials:

  • Find an introduction to what’s in the box, here >>
  • Erin Bassett is a pro. See her video tutorials, here >>
  • Find some good tips and tricks, here >>
  • Buy more accessories and supplies, here >>

And have fun~I sure do!

Until Tomorrow~Sarah

DIY 361: Organize Your Kitchen Into Zones

A few years back we visited a chef friend in Colorado. Tom makes his own pasta, bread, and grows a garden of herbs and greens. What really impressed us, though, was the organization of his kitchen. He schooled us on the finer points of “Proximity in the Kitchen.”  It goes like this:

Optimize efficiency in the kitchen:

  1. Sit in your kitchen for a few minutes making a list of the things you often prepare. (Mine is something like this: Coffee and toast in the a.m.; packing sandwiches for lunch; overall chop/prep for dinner; weekend baking.)
  2. Organize your kitchen into zones: The Breakfast Zone, the Baking Zone, The Prep Zone, etc.
  3. Pull everything out of the cabinets and place on the kitchen table (or floor) into groupings according to the Zones you have determined. Toaster and coffee machine; measuring cups, bowls, flower and sugars; knives and cutting boards, etc.
  4. Put everything back into the Zones. (Do not~yet~reshelve anything you haven’t used in a year or more. When you are done replacing all the things you use often, tuck the things you use less often in the harder-to-reach cabinets or give that stuff away!)

The Coffee Station


Group the grinder, coffee maker, cups, spoons, sugar bowl and creamer pitcher, coffee, tea, honey and anything else you use to make a delectable drink on a large tray and stash on a shelf or put on the counter for display. TIP: The tray makes clean up easy…just move the tray and wipe up a mess! (Mine coffee station is on a tray in a big cubby hole in a piece of furniture in the kitchen. It’s easy to access and looks good.)

The Baking Zone


Put all flour, sugars, baking soda/powders, chocolates, measuring cups, bowls and baking dishes into one cabinet above/below the largest work space. Since baking routinely takes the most space put everything you need within arm’s reach. (One friend of mine who is especially fond of baking converted an alcove near the kitchen into a baking station~go here to read her blog about it.)

“Sharps” Drawer, or “Sharps” Magnet


Tom has a wide selection of knives and has them off the counter and safely put away in a drawer near his chopping block. Now, I am short on counter space so I opted for a magnetic knife holder. (Those knife blocks are inefficient; they take up way too much room and don’t assist in the choosing of the proper knife.) A Sharps Drawer/Bar displays the blades for the perfect choice the first time.

Spice Drawer


Another must-have-for-efficiency is a spice drawer. Those carousels are messy and spices are hard to find. The top drawer directly adjacent the range is the place for spices. Line the drawer with non-skid mat to keep the little jars from scooting around. (Here’s one at Target.)

Handy Cooking Tray


On the counter next to the range-top put a pretty tray or plate with all the essentials: olive oil, salt, pepper, garlic, garlic press, and taster spoons. The tray or plate makes it easy to move and wipe up after making dinner.

Less steps = less time = greater efficiency = more fun in the kitchen!

Until Tomorrow~Sarah

DIY 364: Frame Vintage Photograhs

My mom calls this a “Rogues Gallery.” I call it “a great place to put all those old photos dad off-loaded onto me a few years ago~citing me as the ‘family historian.'” I did some research on how best to handle these (admittingly cool) pics and found great information on the National Archives site. They go into great detail about how to preserve these little bites out of history.

Make your Own Rogues Gallery:

  1. Buy frames you love, or re-purpose ones that are laying around, and frame up family pictures, or any other grouping you want to see everyday.
  2. Lay out a grid: clear a table or a space on the floor and figure out how you want the grouping to look on the wall. ~Since I used all different sizes I couldn’t do a regular grid. I ran four columns (top to bottom) with parallel spaces between the 1st and 2nd and the 3rd and 4th. Check out the graphic below~a picture is worth a thousand words, right?
  3. Measure thrice, hammer once.

Until Tomorrow~Sarah

Wacom Bamboo pad with Photoshop, Wow!

It’s incredible! My life has just opened into new possibilities… I have been using Photoshop for 20 years or so and never knew I could achieve lines like these…thanks to the Bamboo Craft pad and pen from Wacom. Thick to thin, light to dark, depending on pressure. I whipped out a quick graphic for Michelle to take with her on her trip to Australia where she’s running a Yudu screen printing workshop for Provo Craft. In the past I hit a blank sheet of paper with a marker, scanned it in, cleaned it up, etc, etc. What a time saver. I am getting used to the draw here, see results there, and I look forward to all the fast and fun things I’ll be making.

This design was set up to be printed on the Yudu screen printer. Michelle will have to separate the pink from the black and make 2 screens. I’ll run a demo using this design soon. Check back!

Celebrating Belgium (one more reason to like beer)

We love to throw parties, and especially one with a theme. This weekend we had our annual Belgium Party. Why Belgium? Well, it started a couple years ago after a trip to Europe. We went to visit a friend in Amsterdam, but one weekend we decided to hop a train and go to Belgium, because—we heard—they have good beer and chocolate covered waffles.

We chose that particular weekend for a music festival happening in Antwerp. And since the train ride is short, we got there in plenty of time to attain a map and get acquainted with the city. We discovered the music festival was on a bus route that ran right by our hotel.

That evening, the driver assured us with a nod (he seemed not to speak English) that he would tell us where to get off. We settled into the front seats and watched the old city of Antwerp slide by.

As the miles passed we began to notice the commercial buildings lessening and the residential neighborhoods growing. When the driver motioned we had arrived at our destination, we were in the heart of a residential neighborhood. We looked at the map again and indeed we were in the right place.

I have to admit I was a little nervous as the bus pulled away. The (American) tell-tale signs of a music festival were nowhere in sight. There were no large groups of people getting off the bus or headed the direction we were; There were no signs pointing the way; And, we couldn’t hear any music. I was afraid we were in the wrong place, or had the wrong time. With no other option but to follow our original plan, we walked a few blocks to where the festival was supposed to be.

When we turned the final corner we were delighted to see the street cordoned off and signs for the festival. We had arrived. I was instantly charmed by the Sesame Street style row houses and cheery people milling about. Children played as smiling policemen chatted with parents. I watched a nearby trashcan half expecting Oscar the Grouch to pop out, but maybe everyone was too happy for him to make an appearance.

The festival was contained in a grade school playground; The school rose four stories and completely surrounded the concrete space. A large stage was set up on one end, and food booths (mostly African cuisine) lined the opposite end. In the middle was the bar where we spent most of the night chatting with the locals and making friends.

We had a blast hearing new music and talking for hours with one chap in particular. Geert—a drummer in the band Lost Romeo—told us everything we wanted to know about Belgium, beer made by monks, and why the country is split by two languages—French and Dutch. It turns out the ad we found for the festival was in a neighborhood newsletter. Our new friends were surprised and amazed that we had come all that way for their block party. We were too. That little adventure still stands as one of our favorite happy accidents.

At the end of a very fun night we asked Geert if there was some bit of Belgium information we could take back to America to tell our friends. He replied, saying he’d like us all to know fries are Belgian not French, and they are called pomme frites. Keeping to our promise, we have a party every year and make pomme frites and serve beer made by monks. The chocolate covered waffles are part of the party because I couln’t get enough of them while there and I need a good excuse to make them here.

This year I stepped up the decorating by breaking out my Cricut and Cuttlebug to make signs. The front door says “Welcome” in Dutch and French—the two languages of Belgium. I embossed the Belgian Facts cards to make them pretty as well as informational and cut words out to stick on the beer cooler. I even went as far as to screen-print t-shirts for a few guests (love my yudu!).

This party is our homage to taking chances and following your heart—and, of course, a celebration of good beer.


St. Patty's Day door flair

With St. Patrick’s Day right around the corner, I had to whip out a little home decor or else I’d hear it from mom. She does such a great job decorating for the holidays, and being Irish, she pulls out the stops for St. Patrick.

Today I had to work fast. With looming deadlines and a business trip just two days away, I only had an hour to figure something out and produce it. My freshly remodeled studio helped a lot thanks to my contractor husband. He rewired, painted, and didn’t complain when I bought new Ikea furniture.

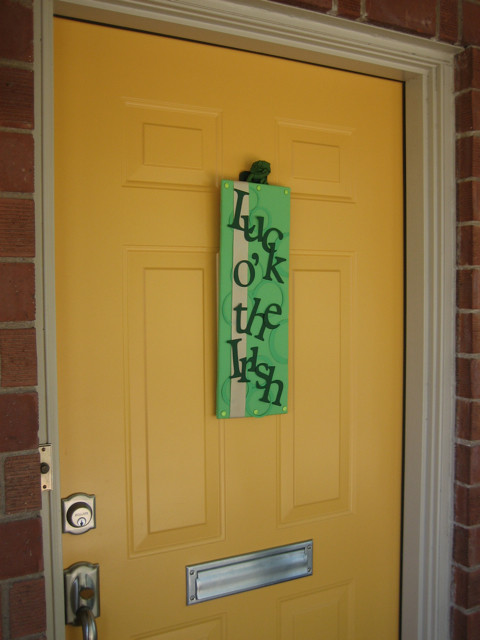
I started by covering a piece of cardboard with batting and fabric and used my favorite quick adhesive (a hot glue gun) to secure the back. Then I used my new cricut expression and cuttlebug to cut the letters and background circles. I didn’t want to go too crazy with the color, considering my front door is already a bright yellow, so I kept the palette to greens and a cream ribbon. I secured everything with more hot glue and finished it off by tying a knot in a strip of dark green fabric and attaching at the top to hang. With the yellow door, it looks as cheery as my Irish family is.

Fast, easy and festive, just the way I like it!